

Dispensing for spin coating: volumes, methods and fixing drips
How the liquid reaches the substrate has a bigger effect on a spin-coated film than most people expect. Volume, position, timing and cleanliness all show up as defects if they’re wrong. This guide covers the decisions that matter, from a pipette on the bench to a fully automated dispense line.
How much to dispense
Once the substrate is fully covered, extra liquid doesn’t make the film thicker. It flies off the edge. Most of what’s dispensed ends up in the bowl, often more than 90%, so the aim is the smallest volume that covers the substrate reliably.
Good starting points:
| Substrate | Static dispense | Notes |
|---|---|---|
| Small pieces (10 to 25 mm) | 20 to 100 µl | Dynamic dispense at the lower end of the range |
| 50 mm (2″) | About 1 to 2 ml | |
| 100 mm (4″) | About 3 to 4 ml | |
| 150 mm (6″) | About 5 to 6 ml | |
| 200 mm (8″) | About 8 ml |
The usual rule is about 1 ml per inch of substrate diameter for static dispense. Viscous materials and substrates that wet poorly need more, and dynamic dispense needs less. If you see uncoated patches at the edge, increase the volume before changing anything else.
Static or dynamic dispense
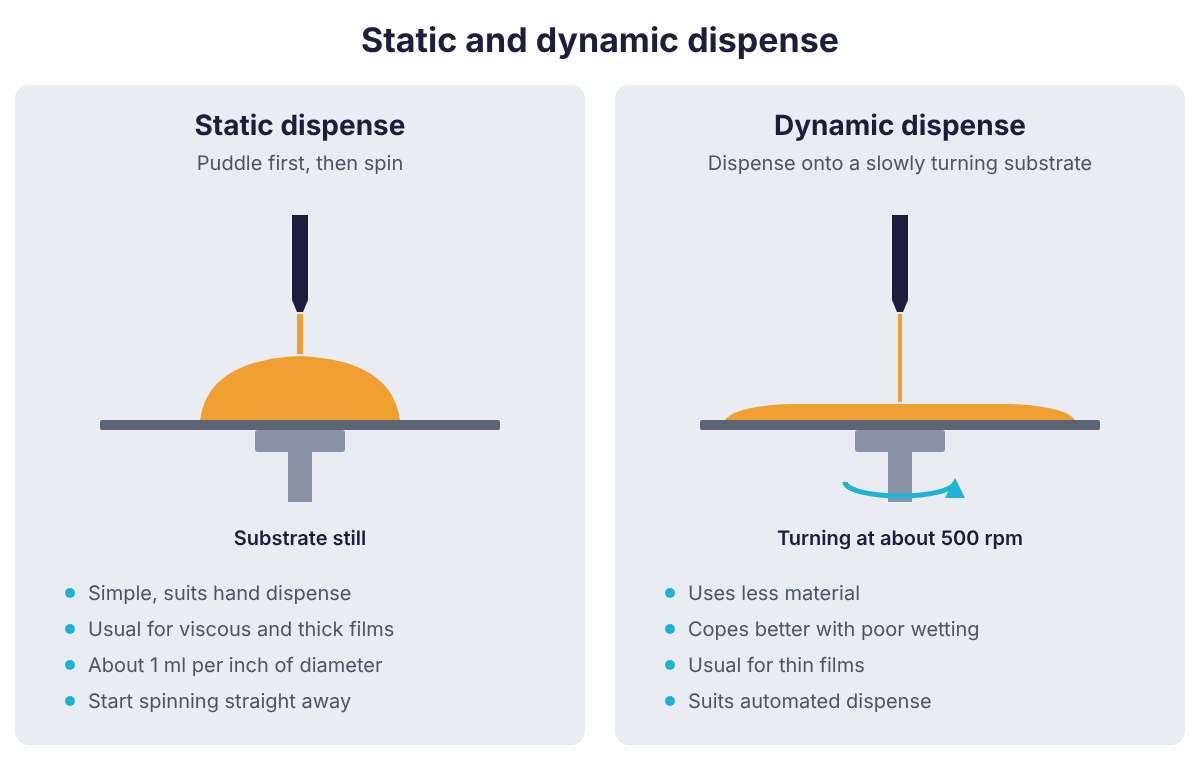
Static dispense puts a puddle on the still substrate before the spin starts. It suits manual work and is the usual choice for viscous and thick-film materials. Cover around half the substrate diameter with the puddle, then start spinning straight away. Any delay lets the centre start to dry, which leaves a thicker spot.
Dynamic dispense delivers the liquid while the substrate turns slowly, typically at around 500 rpm. It uses less material and copes better with liquids that don’t wet the surface well. It’s the usual choice for thin films and automated dispense.
Whichever you use:
- Dispense at the centre. Off-centre dispense causes swirls and comets.
- Keep the tip close. A height of 6 to 12 mm above the surface avoids splashing and trapped air.
- Purge the tip first. A small dispense to waste before each substrate clears any skin that has formed in the nozzle.
- Keep it consistent. Use the same volume and timing on every substrate. Automated dispense does this for you.
Keeping bubbles and particles out
- Let the material rest. After shaking or decanting, give thin resists 20 minutes or more, and viscous ones a few hours. Some positive resists release gas when the bottle is first opened.
- Filter at the point of use. A filter of 0.2 µm or finer suits most photoresists. New filters need flushing before they’re clean, so run material through to waste first.
- Avoid air in the line. A loose fitting can draw air in without any sign of a leak.
- Watch pressurised materials. Liquid held under nitrogen pressure for a long time absorbs gas, which comes back out as bubbles when the pressure drops. Vent the can when it’s idle for long periods.
Choosing a dispense method
| Method | Suits | Viscosity range (CEE) | Volumes |
|---|---|---|---|
| Pipette or syringe by hand | Research, trials, very small amounts | Any the operator can handle | Microlitres to a few ml |
| Disposable syringe dispense | Expensive or experimental materials, frequent changes | 1 to 6,000 cP (12,000 cP with a larger needle) | 30 or 55 ml barrels |
| Cartridge dispense | R&D and production with moderate volumes | 1 to 3,000 cP (5,000 cP with an upgraded valve) | 74 to 946 ml |
| Pressure can dispense | Production volumes, solvents, developers | 1 to 3,000 cP (10,000 cP gravity-fed) | 1 to 10 gallon reservoirs |
Hand dispense is perfectly good for research. Automated dispense earns its place when repeatability matters, because the recipe sets the volume and timing every time and the valve shuts off cleanly with suckback. Our dispense hub covers each system in detail.
Fixing a dripping tip
A tip that drips after the dispense has finished is the most common complaint with automated dispense. Work through the causes in this order.
- Suckback volume. The valve should pull the liquid back just inside the tip after each shot. If it doesn’t, increase the suckback setting a little at a time. Around 3 mm of retraction is a sensible starting point.
- Suckback speed. If the liquid retracts with a snap or you see bubbles, the action is too aggressive. A smooth movement over half a second to a second works for most materials.
- Supply pressure. Too much pressure pushes liquid past a valve that’s otherwise set correctly. The standard CEE dispense valve takes no more than 29 psi of fluid pressure.
- The valve seat. Dried material on the seat stops the valve closing fully, and no suckback setting will fix it. Clean the valve.
- Fittings and tips. Check for loose fittings that let air in, and for damaged or blocked tips. With viscous materials, a short, wide or tapered tip reduces oozing after the shot.
Change one setting at a time, and run several dispenses after each change before judging the result. A new material, tube or tip needs the suckback settings checking again.
How SiSTEM can help
Apogee spin coaters take manual dispense through the lid and up to five automated dispense lines. We can add automated dispense to many CEE tools already in use. Send us your materials, their viscosity and how much you use, and we’ll recommend the set-up.