

Spin coating defects: causes and fixes
Most spin coating defects trace back to a short list of causes: particles and bubbles, the way the liquid was dispensed, the speed profile, and the air around the substrate. Name the defect correctly and the fix is usually quick. The table below covers the ones we’re asked about most, and the notes after it explain the less obvious ones.
Defects at a glance
| Defect | What it looks like | Likely cause | Fix |
|---|---|---|---|
| Comets | Short streaks with a spot at the head, pointing outward | A particle or bubble pushed outward by the spreading film | Filter the material, clean the substrate, let the resist degas, start the spin promptly |
| Pinholes | Small holes through the film | Particles on the substrate or in the liquid, or tiny bubbles | Clean the substrate, filter, degas, check the dispense tip for damage |
| Bubbles | Round voids, often near the centre | Air from shaking or pipetting, gas released by some positive resists, a cut or burred tip | Let the bottle stand before use, dispense gently, replace damaged tips |
| Striations | Fine radial lines running out from the centre | Surface tension changes as solvent evaporates unevenly | Keep the bowl atmosphere solvent-rich, reduce exhaust, coat at a stable, slightly cooler temperature |
| Swirl pattern | A spiral of thickness variation | Strong exhaust, off-centre dispense, high acceleration or a spin that’s too short | Reduce exhaust and acceleration, centre the dispense, lengthen the cast step |
| Uncoated areas | Bare patches, usually at the edge | Too little liquid, slow acceleration or poor wetting | Dispense more, ramp faster, improve wetting with a spread step or adhesion promoter |
| Thick centre spot | A thicker disc a centimetre or so across | Delay between dispense and spin, so the centre starts to dry first | Start spinning straight after dispensing |
| Chuck mark | A faint circle the size of the chuck | The chuck changes the local temperature, so the film dries at a different rate above it | Use a plastic (acetal) chuck, and let substrate and chuck reach room temperature |
| Edge bead | A raised rim at the edge | Liquid gathers at the edge before it can fling off | Solvent edge bead removal, or the recipe changes in our edge bead guide |
| Corner build-up and ripples on squares | Thick corners and wavy patterns | Turbulent airflow at the corners | Recessed chuck, lower speed, closed bowl (see our guide to coating squares) |
| Skins and clots | Lumps or dried flakes in the film | Resist drying at the tip of the dispense nozzle between runs | Dispense a little to waste first, keep idle times short, reduce exhaust near the nozzle |
| Dewetting | The film pulls back into islands or leaves bare areas after spreading | Low surface energy, moisture or contamination on the substrate | Dehydration bake, vapour HMDS priming, or an adhesion layer on noble metals |
| Cotton candy fibres | Fine dried strings round the edge, in the bowl and on the lid | Material at the edge dries into threads before it can leave as droplets | Slow the cast step, lower the exhaust during casting, run BSR or EBR early in the spin (see our cotton candy guide) |
| Poor run-to-run repeatability | Thickness drifts between runs or days | Changing exhaust or humidity, off-centre substrates, varying dispense volume | Stable exhaust, closed bowl, centering device, automated dispense |
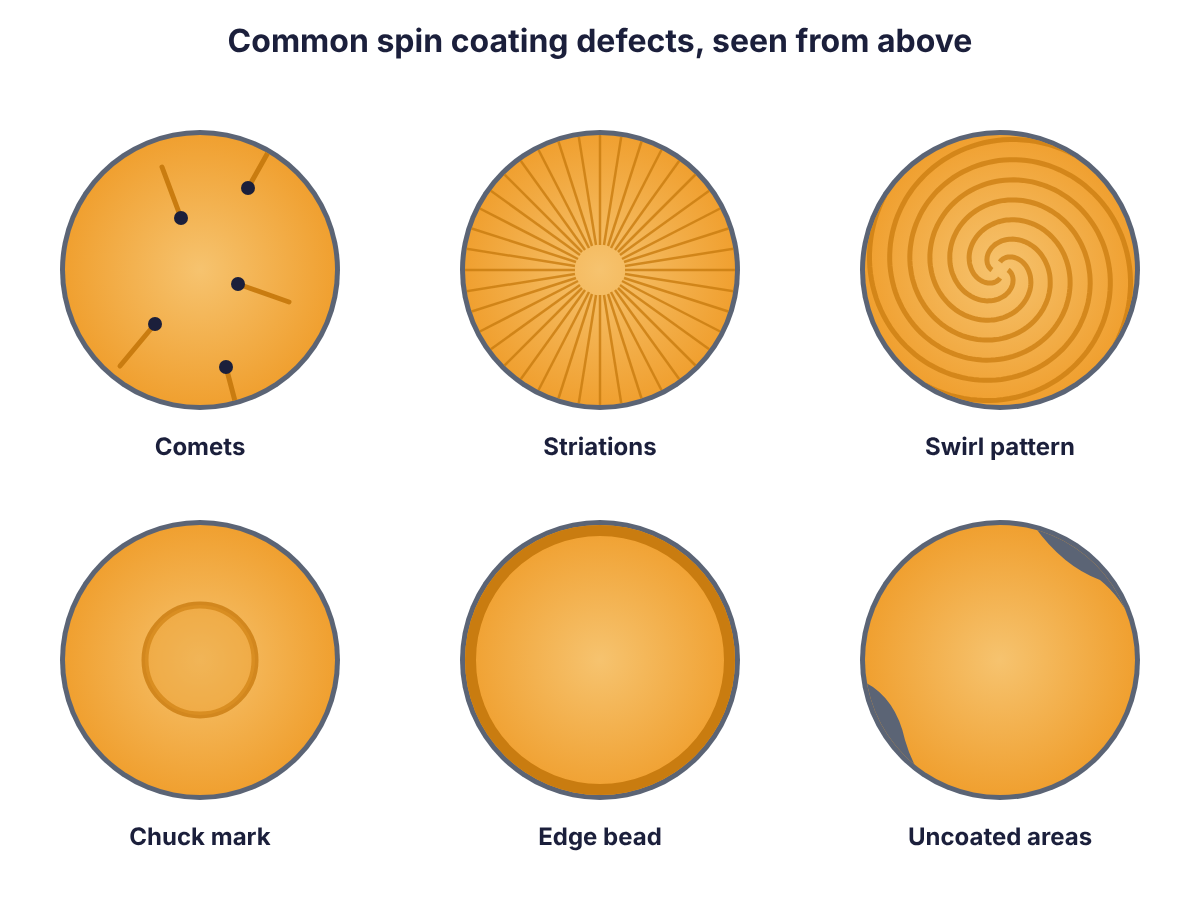
Particles and bubbles
Comets, pinholes and most bubbles share a cause: something in the liquid or on the surface that the spreading film flows around. Three habits deal with most of them.
- Filter at the point of use. A filter of 0.2 µm or finer removes most particles. Small bubbles below about 10 µm can’t be seen and rise very slowly, so they need time to clear.
- Let the material settle. After shaking or decanting, give thin resists 20 minutes or more, and viscous ones a few hours. Positive resists can release gas when the bottle is first opened, so loosen the cap and leave them to settle.
- Dispense gently. Keep the tip close to the surface and avoid pushing the last drop out of a pipette, which brings air with it.
Striations
Striations are fine radial ridges, spaced at around half the film thickness. As solvent evaporates, the surface cools and its composition changes, and the resulting differences in surface tension drive tiny circulating flows in the film. When the film sets, those flows leave ridges behind. Slowing evaporation is the cure. Keep the bowl closed, cut the exhaust during the cast step, and coat in a stable, slightly cooler room. With a stubborn material, a solvent blend that evaporates more evenly also helps.
Chuck marks
A faint circle matching the chuck size comes from heat. Metal chucks conduct heat into or out of the substrate, so the film above the chuck dries at a slightly different rate. Plastic chucks reduce the effect a great deal, which is why CEE make their standard vacuum chucks from acetal (Delrin). Letting substrates reach room temperature before coating helps as well.
Repeatability
When a film is good on one run and slightly off on the next, the cause is usually in the surroundings. Exhaust that varies with what else is running on the duct, humidity that rises through the day, hand-dispensed volumes and substrates loaded slightly off centre all add up. A closed bowl, programmable exhaust, automated dispense and a centering device take most of these variables out. Logging every run, as DataStream does on Apogee tools, makes it easy to see which one changed.
How SiSTEM can help
If a defect doesn’t match anything here, send us a photo and your recipe. We’ll look at it with CEE’s process team. Apogee spin coaters, spin chucks and dispense systems are all supplied and supported by SiSTEM across the UK and Europe.