

Spin coating thick films: SU-8, thick positive resists and polyimide
Thick films behave differently from thin ones. Once a coating is more than a few microns thick, the material is viscous, much of the solvent stays in the film after the spin, and the edge bead grows with the thickness. Recipes that work well for a 1 µm resist give streaks, bubbles, thick edges or cracked films at 50 µm. This guide covers the changes that make thick films repeatable, from the dispense through to the bake.
How thick is thick
As a rough guide, the materials below are the ones labs most often use for thick layers. The resist maker’s spin curve for your grade is always the starting point.
| Material | Typical range per coat | Notes |
|---|---|---|
| Epoxy negative resists such as SU-8 | Under 1 µm to over 200 µm, depending on grade | Thicker grades are very viscous |
| Thick positive resists | Roughly 5 to 60 µm | Thicker layers are built up in several coats |
| Chemically amplified thick positive resists | Roughly 30 to 300 µm | For plating moulds and bumping |
| Polyimide | Roughly 1 to 15 µm | Thicker layers in two to four coats |
Dispensing viscous material
Thick-film materials are slow to flow and slow to release trapped air, so the dispense needs more care than it does for thin resists.
- Let it degas. After decanting, give a viscous resist a few hours to clear its bubbles before you coat. A bubble in a 100 µm film shows as a crater.
- Dispense statically at the centre. A puddle of about 1 ml per inch of substrate diameter, laid down at the centre with the tip close to the surface, is a good start.
- Choose a dispense that can push it. Viscous materials need syringe or pressure can dispense rated for the viscosity, and larger shots than thin resists. Our dispensing guide compares the options.
The spin recipe
A thick-film recipe usually has three steps.
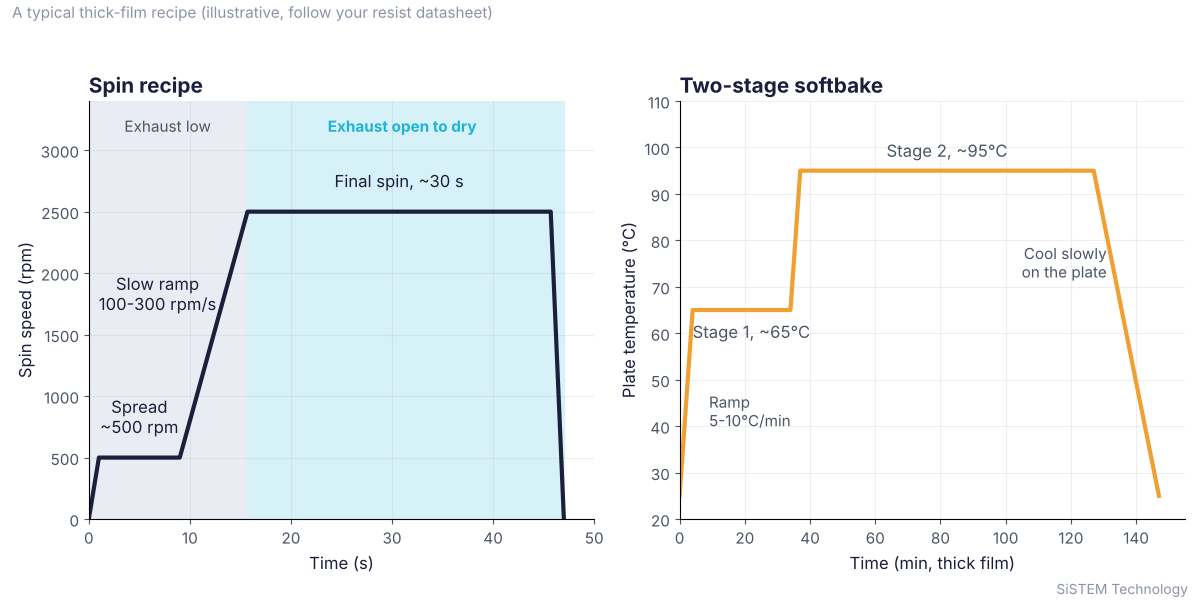
- Spread. Turn the substrate at around 500 rpm for 5 to 10 seconds so the material reaches the edge before it starts to thin.
- Slow ramp to the final speed. Thick materials prefer gentle acceleration, often 100 to 300 rpm/s, where a thin resist usually wants a fast ramp. A fast ramp on a viscous film throws material off unevenly and leaves streaks.
- Final spin. Typically 1,000 to 3,000 rpm for about 30 seconds. The grade sets the thickness range, and the speed fine-tunes it within that range. Our spin coating theory guide explains how speed and time set thickness.
Exhaust matters more with thick films. Keeping the exhaust low during the spread and ramp stops the surface skinning before the film has levelled. Open it fully for the drying part of the spin. Programmable exhaust makes this part of the recipe. Some labs also prewet the substrate with solvent before dispensing, which helps viscous material spread.
Edge bead
The bead grows with film thickness, and on a thick film it can be several times higher than the rest of the coating. Left in place, it holds the mask off the film during contact exposure and ruins resolution near the edge. A short jump in speed at the end of the cast step throws off some of it, and solvent edge bead removal clears the rest. Our edge bead guide covers both.
Thick epoxy resists are also among the materials most likely to show the cotton candy effect, where fibres form at the substrate edge. A slower cast step and lower exhaust during casting usually cure it.
Let it relax before baking
A freshly spun thick film is still flowing. Leaving the substrate flat for 10 to 15 minutes, or longer for the thickest layers, lets the surface level and the edge bead settle before the bake fixes it in place. Keep the substrate level and covered while it rests.
Building up in several coats
When one coat can’t reach the thickness you need, build it up in layers. Bake each coat lightly before the next, at a lower temperature than the final softbake, so it’s firm enough to coat over without being fully dried. Thick positive resists are typically given an intermediate bake at 90°C or below. Polyimides use a bake of around 170°C between coats, with the full cure at the end.
Baking thick films without cracks
Most problems with thick films show up in the bake. Thick layers hold a lot of solvent, and they build stress if they heat or cool too quickly.
- Use a hotplate. An oven heats the film from the outside in, so a skin forms on top and traps solvent underneath. A hotplate heats from the substrate up and drives the solvent out through the surface.
- Bake in stages. Epoxy resists are usually softbaked at two temperatures, typically around 65°C and then 95°C. Bake times grow quickly with thickness. A 250 µm film can need half an hour at the lower temperature and an hour and a half at the higher one.
- Ramp gently, up and down. Heating at 5 to 10°C a minute, and letting the substrate cool slowly on the plate, prevents cracks and lifting. Fast changes in temperature are the most common cause of cracked thick films.
- Read the film. Wrinkles on an epoxy film after the softbake mean it’s underbaked. Cool it, bake it again and check.
Programmable lift pins make staged baking easier on a single plate. Holding the substrate above the plate and lowering it in steps warms it gently, which suits thick films and substrates that crack under thermal shock.
Thick positive resists need water
Positive resists based on DNQ need water in the film to develop properly. A thick layer loses most of its water in the softbake, and it takes time to take it back from the air. Allow about a minute per micron of film after the bake, and several hours for layers above about 30 µm, in a room at 40 to 50% relative humidity. If you skip this, development is slow and the sidewalls come out poorly.
How SiSTEM can help
Apogee spin coaters have closed bowls and recipe-controlled exhaust, and they take syringe and pressure can dispense for viscous materials, all covered on our dispense and bowl accessories page. Apogee bake plates add programmable lift pins and temperature ramping for staged bakes. If you’re working on a thick-film process, send us the material, the target thickness and your substrate, and we’ll put a starting recipe together with CEE’s process team.